在 Windows 调试一些程序的时候,有可能会遇到程序本身编译为始终以管理员身份运行的。而这些程序在拿到管理员身份的时候会启动一些保护以检测自己是否被调试注入等等。

而我们不希望这些程序以管理员身份启动。

如果是直接启动该程序,我们可以使用命令:

cmd /min /C "set __COMPAT_LAYER=RUNASINVOKER && start "" "(your app path)"

替换 (your app path) 部分为你们的程序路径

如果经常需要使用的话,还可以把该命令集成到 Windows 右键菜单里,通过注册表

RunWithoutPrivilegeElevation.reg

Windows Registry Editor Version 5.00

[HKEY_CLASSES_ROOT\*\shell\Run Without Privilege Elevation]
@="Run Without Privilege Elevation"

[HKEY_CLASSES_ROOT\*\shell\Run Without Privilege Elevation\command]
@="cmd /min /C \"set __COMPAT_LAYER=RUNASINVOKER && start \"\" \"%1\"\""

点我下载:RunWithoutPrivilegeElevation.reg

但有时该程序是被另外的程序启动的,这时我们就无法执行命令来启动了。 不过不用担心,Windows 还给了我们另外的方案

为程序设置 Compatibility Flags

DisableAppRunAsAdministrator.reg

Windows Registry Editor Version 5.00

[HKEY_CURRENT_USER\Software\Microsoft\Windows NT\CurrentVersion\AppCompatFlags\Layers]
"(your app path)"="RunAsInvoker"

替换 (your app path) 部分为你们的程序路径

设置好后,无论是谁启动的该程序,程序都无法以最高的管理员身份运行了。

收到别人发来的压缩包,结果解压出来文件名是乱码。 这种情况在别人和自己使用不同的操作系统平台以及编码时经常发生,为了解决这一问题。自己编写了使用指定编码解压文件的程序。

zip_name_fixer.py

#!/usr/bin/env python3
# -*- coding: utf-8 -*-

import argparse
import zipfile


def main():
    parser = argparse.ArgumentParser(description='ZIP filenames fixer')
    parser.add_argument('path', type=str, help='path to the ZIP file.')
    parser.add_argument('encoding', type=str, help='encoding of the filenames inside the ZIP file.')
    parser.add_argument('-o', '--output', type=str, help='output directory for the extracted files.', default='.')
    parser.add_argument('-p', '--password', type=str, help='decompression password for the ZIP file.', default='')
    args = parser.parse_args()

    with zipfile.ZipFile(args.path, 'r', metadata_encoding=args.encoding) as zip:
        zip.extractall(path=args.output, pwd=args.password.encode('utf-8'))


if __name__ == '__main__':
    main()

点我下载:zip_name_fixer.py

使用方式: python zip_name_fixer.py [-h] [-o OUTPUT] [-p PASSWORD] path encoding

其中 encoding 就是python中常用的编码代码,例如: gbkcp437 等等…

同时顺手还写了一个针对 tar.gz 压缩包的。

tar_name_fixer.py

#!/usr/bin/env python3
# -*- coding: utf-8 -*-

import argparse
import tarfile


def main():
    parser = argparse.ArgumentParser(description='tar.gz filenames fixer')
    parser.add_argument('path', type=str, help='path to the tar.gz file.')
    parser.add_argument('encoding', type=str, help='encoding of the filenames inside the tar.gz file.')
    parser.add_argument('-o', '--output', type=str, help='output directory for the extracted files.', default='.')
    args = parser.parse_args()

    with tarfile.open(args.path, 'r:gz', encoding=args.encoding) as tar:
        tar.extractall(path=args.output)


if __name__ == '__main__':
    main()

点我下载:tar_name_fixer.py

使用方式: python tar_name_fixer.py [-h] [-o OUTPUT] path encoding

当遇到某人发来的文本內容内不是标准 utf-8 编码时,可以使用本程序来进行转换。

转换时遇到文本行尾使用了Windows专用的 CRLF 换行符时,也会将文本行尾统一更换为 LF。这样的好处是可以缩小文本文件的空间占用,并且可以保证该文件可以在基于Unix和Linux的操作系统以相同的格式显示。

encoding_line_ending_converter.py

#!/usr/bin/env python3
# -*- coding: utf-8 -*-

import argparse
import os


def main():
    parser = argparse.ArgumentParser(description='Text Encoding and Line Ending Converter')
    parser.add_argument('path', type=str, help='directory to be traversed and processed.')
    parser.add_argument('encoding', type=str, help='encoding of the text file.')
    parser.add_argument('-e', '--extensions', type=str, help='only process specified file extensions. use "|" as the separator, for example: ".txt|.log|.html"', default='')
    parser.add_argument('-q', '--quiet', action='store_true', help='do not output information during processing.')
    parser.add_argument("-v", "--verbose", action="store_true", help="increase output verbosity")
    args = parser.parse_args()
    extensions = tuple(args.extensions.split('|'))

    processed_count = 0
    for root, _, files in os.walk(args.path):
        for file_name in files:
            if len(extensions) == 0 or file_name.endswith(extensions):
                if trans(os.path.join(root, file_name), args.encoding, args.quiet, args.verbose):
                    processed_count += 1

    if not args.quiet:
        print(f'{processed_count} files have been processed.')


def trans(file_path, file_encoding, quiet, verbose) -> bool:
    """Convert file encoding and line endings."""
    # check file encoding
    encoding = 'utf-8'
    content = ''
    try:
        with open(file_path, 'r', encoding=encoding) as f:
            content = f.read()
    except UnicodeDecodeError:
        with open(file_path, 'rb') as f:
            try:
                content = f.read().decode(file_encoding)
                encoding = file_encoding
            except UnicodeDecodeError:
                if not quiet:
                    print(f'{file_path} the file encoding is not {file_encoding}.')
                return False

    # determine if a file uses LF line endings.
    if '\r' in content:
        # convert CRLF line endings to LF.
        content = content.replace('\r\n', '\n')

        # write content
        with open(file_path, 'w', encoding='utf-8', newline='\n') as f:
            f.write(content)

        if not quiet:
            print(f'{file_path} the file encoding and line endings have been converted to UTF-8 and LF.')
        return True
    if encoding != 'utf-8':
        # write content
        with open(file_path, 'w', encoding='utf-8', newline='\n') as f:
            f.write(content)

        if not quiet:
            print(f'{file_path} the file encoding has been converted to UTF-8.')
        return True
    if not quiet and verbose:
        print(f'{file_path} the file is now encoded in UTF-8 with LF line endings.')
    return False


if __name__ == '__main__':
    main()

点我下载:encoding_line_ending_converter.py

> python encoding_line_ending_converter.py -h

usage: encoding_line_ending_converter.py [-h] [-e EXTENSIONS] [-q] [-v] path encoding

Text Encoding and Line Ending Converter

positional arguments:
  path                  directory to be traversed and processed.
  encoding              encoding of the text file.

options:
  -h, --help            show this help message and exit
  -e EXTENSIONS, --extensions EXTENSIONS
                        only process specified file extensions. use "|" as the separator, for example: ".txt|.log|.html"
  -q, --quiet           do not output information during processing.
  -v, --verbose         increase output verbosity

其中 encoding 就是python中常用的编码代码,例如: gbkcp437 等等…

Header Content Footer 布局

<!doctype html>
<html lang="en">
  <head>
    <meta charset="UTF-8" />
    <meta name="viewport" content="width=device-width, initial-scale=1.0" />
    <title>Tailwind CSS Box Layout</title>
    <script src="https://cdn.tailwindcss.com"></script>
    <style type="text/tailwindcss">
      html,
      body {
        font-family: ui-monospace, SFMono-Regular, SF Mono, Menlo, Consolas, Liberation Mono, monospace;
        color: #c9d1d9;
        background-color: #0d1117;
      }
    </style>
  </head>

  <body>
    <div id="box" class="flex flex-col h-screen justify-between">
      <header class="border-b p-5">Header</header>
      <main class="flex flex-1 flex-col justify-center items-center mb-auto h-auto bg-gray-900">Content</main>
      <footer class="flex justify-center items-center border-t border-gray-800 p-6">Footer</footer>
    </div>
  </body>
</html>

线上预览

预览

准备工作

  • 安装 Scoop
  • 安装 Visual Studio 2022
  • 安装 Ninja v1.11.1
  • 安装 Python v3.10 和 Numpy
  • 安装 wget 和 7zip
  • 安装 Cuda SDK v11.7
  • 一键下载 OpenCV 4.6.0 源码并编译
  • 部署
  • 测试 OpenCV

安装 Scoop

打开 PowerShell 后执行:

Set-ExecutionPolicy RemoteSigned -Scope CurrentUser
Invoke-WebRequest get.scoop.sh | Invoke-Expression

安装参考: https://scoop.sh

安装 Visual Studio 2022

  1. https://visualstudio.microsoft.com 下载你喜欢的版本,推荐免费的 Community 版本
  2. 安装 使用C++的桌面开发 工作负荷

    使用所选工具(包括 MSVC、CLang、CMake 或 MSBuild)生成适用于 Windows 的现代 C++ 应用

安装 Ninja v1.11.1

scoop install ninja@1.11.1

安装 Python v3.10 和 Numpy

scoop bucket add versions
scoop install python310
pip install numpy

安装 wget 和 7zip

scoop install wget 7zip

安装 Cuda SDK v11.7

安装流程: https://docs.nvidia.com/cuda/cuda-installation-guide-microsoft-windows/index.html#installing-cuda-development-tools

一键下载 opencv 4.6.0 源码并编译

download_and_build_opencv.bat

@ECHO OFF
ECHO -- Downloading OpenCV Source Code --
wget https://github.com/opencv/opencv/archive/refs/tags/4.6.0.zip -O opencv-4.6.0.zip
IF %ERRORLEVEL% NEQ 0 GOTO :error
7z x -y opencv-4.6.0.zip
IF %ERRORLEVEL% NEQ 0 GOTO :error
wget https://github.com/opencv/opencv_contrib/archive/refs/tags/4.6.0.zip -O opencv_contrib-4.6.0.zip
IF %ERRORLEVEL% NEQ 0 GOTO :error
7z x -y opencv_contrib-4.6.0.zip
IF %ERRORLEVEL% NEQ 0 GOTO :error
SET "USERHOME=%USERPROFILE:\=/%"
SET OPENCV_SRC_DIR=%cd%/opencv-4.6.0
SET OPENCV_CONTRIB_SRC_DIR=%cd%/opencv_contrib-4.6.0
SET OPENCV_BUILD_DIR=%cd%/opencv-build
SET SCOOP_ROOT=%USERHOME%/scoop
SET PYTHON_PATH=%SCOOP_ROOT%/apps/python310/current
SET PYTHON_LIBRARY=%PYTHON_PATH%/libs/python310.lib
SET PYTHON_VERSION=3.10
SET CUDA_SDK_DIR="C:/Program Files/NVIDIA GPU Computing Toolkit/CUDA/v11.7"
@REM CUDA_ARCH=8.6 for GeForce RTX 3080 Ti
@REM Choice value for your GPU with: https://developer.nvidia.com/cuda-gpus
SET CUDA_ARCH=8.6
ECHO -- Starting OpenCV Configuration --
call "C:/Program Files/Microsoft Visual Studio/2022/Community/VC/Auxiliary/Build/vcvars64.bat"
@REM If you want to use the Visual Studio 2019 MSVC:
@REM call "C:/Program Files/Microsoft Visual Studio/2022/Community/VC/Auxiliary/Build/vcvars64.bat" -vcvars_ver=14.29
cmake ^
-S%OPENCV_SRC_DIR% ^
-B%OPENCV_BUILD_DIR% ^
-DCMAKE_INSTALL_PREFIX=%OPENCV_BUILD_DIR%/install ^
-DOPENCV_EXTRA_MODULES_PATH=%OPENCV_CONTRIB_SRC_DIR%/modules ^
-DPYTHON3_EXECUTABLE=%PYTHON_PATH%/python.exe ^
-DPYTHON3_INCLUDE_DIR=%PYTHON_PATH%/include ^
-DPYTHON3_LIBRARY=%PYTHON_LIBRARY% ^
-DPYTHON3_NUMPY_INCLUDE_DIRS=%PYTHON_PATH%/Lib/site-packages/numpy/core/include ^
-DPYTHON3_PACKAGES_PATH=%PYTHON_PATH%/Lib/site-packages ^
-DPYTHON_INCLUDE_DIRS=%PYTHON_PATH%/include ^
-DPYTHON_LIBRARIES=%PYTHON_LIBRARY% ^
-DCUDA_TOOLKIT_ROOT_DIR=%CUDA_SDK_DIR% ^
-DENABLE_FAST_MATH=ON ^
-DCUDA_FAST_MATH=ON ^
-DWITH_CUDA=ON ^
-DWITH_CUDNN=ON ^
-DOPENCV_DNN_CUDA=ON ^
-DCUDA_ARCH_BIN=%CUDA_ARCH% ^
-DCUDA_ARCH_PTX=%CUDA_ARCH% ^
-DWITH_OPENGL=ON ^
-DWITH_GSTREAMER=ON ^
-DWITH_FREETYPE=ON ^
-DBUILD_opencv_python3=ON ^
-DCMAKE_CONFIGURATIONS_TYPES=Release ^
-DCMAKE_BUILD_TYPE=Release ^
-DOPENCV_PYTHON3_VERSION=%PYTHON_VERSION% ^
-DBUILD_TESTS=OFF ^
-DBUILD_PERF_TESTS=OFF ^
-DBUILD_JAVA=OFF ^
-DBUILD_opencv_objc_bindings_generator=OFF ^
-DBUILD_opencv_js=OFF ^
-GNinja ^
-DBUILD_opencv_world=ON
IF %ERRORLEVEL% NEQ 0 GOTO :error
ECHO -- OpenCV Configuration has finished, press any key to proceeding to build phase... --
PAUSE > NUL
cmake --build %OPENCV_BUILD_DIR% --target install
IF %ERRORLEVEL% NEQ 0 GOTO :error
ECHO -- OpenCV Build has finished, press any key to install... --
PAUSE > NUL
pip uninstall opencv-python opencv-contrib-python
IF %ERRORLEVEL% NEQ 0 GOTO :error
COPY %OPENCV_BUILD_DIR%/lib/python3/cv2.cp310-win_amd64.pyd %PYTHON_PATH%/Lib/site-packages/cv2.cp310-win_amd64.pyd /Y
IF %ERRORLEVEL% NEQ 0 GOTO :error
COPY %OPENCV_BUILD_DIR%/install/x64/vc17/bin/*.dll %PYTHON_PATH%/Scripts /Y
IF %ERRORLEVEL% NEQ 0 GOTO :error
pip install opencv-contrib-python
IF %ERRORLEVEL% NEQ 0 GOTO :error
ECHO -- all finished, press any key to exit... --
PAUSE > NUL
GOTO :EOF

:error
ECHO -- Error has occurred!!! press any key to exit... --
PAUSE > NUL

点我下载:download_and_build_opencv.bat

部署

  1. 卸载 opencv-python opencv-contrib-python
  2. 拷贝 %OPENCV_BUILD_DIR%/lib/python3/cv2.cp310-win_amd64.pyd%PYTHON_PATH%/Lib/site-packages 目录
  3. 拷贝 %OPENCV_BUILD_DIR%/install/x64/vc17/bin/*.dll 到 Windows 的 %PATH% 目录 或者 %PYTHON_PATH%/Scripts 目录
  4. 重新安装 opencv-contrib-python
pip uninstall opencv-python opencv-contrib-python
COPY %OPENCV_BUILD_DIR%/lib/python3/cv2.cp310-win_amd64.pyd %PYTHON_PATH%/Lib/site-packages/cv2.cp310-win_amd64.pyd /Y
COPY %OPENCV_BUILD_DIR%/install/x64/vc17/bin/*.dll %PYTHON_PATH%/Scripts /Y
pip install opencv-contrib-python

测试 OpenCV

python -c "import cv2; print(cv2.__version__); print(cv2.cuda.getCudaEnabledDeviceCount())"

内容部分占满页面的剩余高度

<!DOCTYPE html>
<html lang="en">

<head>
  <meta charset="UTF-8">
  <meta http-equiv="X-UA-Compatible" content="IE=edge">
  <meta name="viewport" content="width=device-width, initial-scale=1.0">
  <title>Dock.Full</title>
  <style type="text/css">
    html,
    body,
    #full {
      color: #EFEFEF;
      background-color: #423F3E;
      margin: 0;
      padding: 0;
      height: 100%;
    }

    #full {
      background-color: #171010;
      display: flex;
      flex-direction: column;
    }

    #someid {
      background-color: #362222;
      flex-grow: 1;
    }
  </style>
</head>

<body>
  <div id="full">
    <div id="header">Dock.Top</div>
    <div id="someid">Dock.Full</div>
  </div>
</body>

</html>

线上预览

登录框居中显示

<!DOCTYPE html>
<html lang="en">

<head>
  <meta charset="UTF-8">
  <meta http-equiv="X-UA-Compatible" content="IE=edge">
  <meta name="viewport" content="width=device-width, initial-scale=1.0">
  <title>Document</title>
  <style type="text/css">
    html,
    body,
    #parent {
      color: #EFEFEF;
      background-color: #423F3E;
      margin: 0;
      padding: 0;
      height: 100%;
    }

    #parent {
      background-color: #171010;
      /* 使用Flex布局 */
      display: flex;
      /* 主轴位于中间 */
      justify-content: center;
      /* 交叉轴位于中间 */
      align-items: center;
    }

    #someid {
      background-color: #362222;
      width: 200px;
      height: 200px;
    }
  </style>
</head>

<body>
  <div id="parent">
    <div id="someid">Dialog Content</div>
  </div>
</body>

</html>

线上预览

问题出现

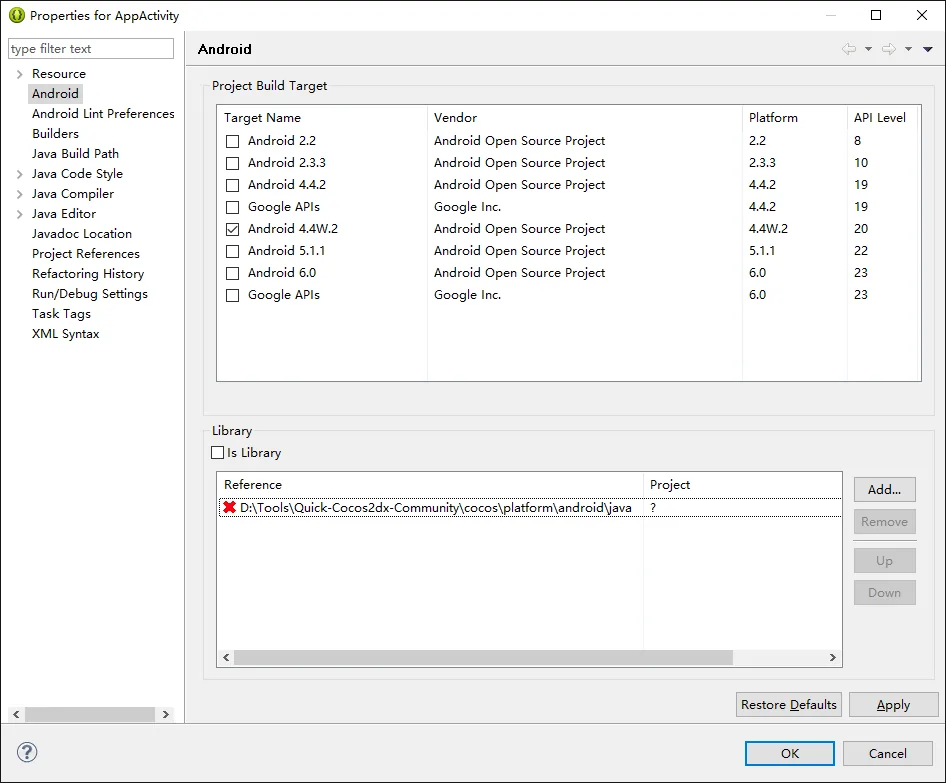
今天在Windows里使用 Cocos-Quick 创建的项目在使用ADT往Android里面部署的时候遇到了下面的问题

出现上图的情况是这样的操作步骤:

  1. 添加 D:\Tools\Quick-Cocos2dx-Community\cocos\platform\android\java 到 Library 引用里
  2. 点击 OK
  3. 重新打开这个配置界面

问题解决

测试了许久后,无意间发现有次选错了路径后Library正常了

当时我选择的 Quick 是 ** F:\Quick-Cocos2dx-Community ** 选择的项目目录是 ** F:\Code\Cocos\QuickHello **

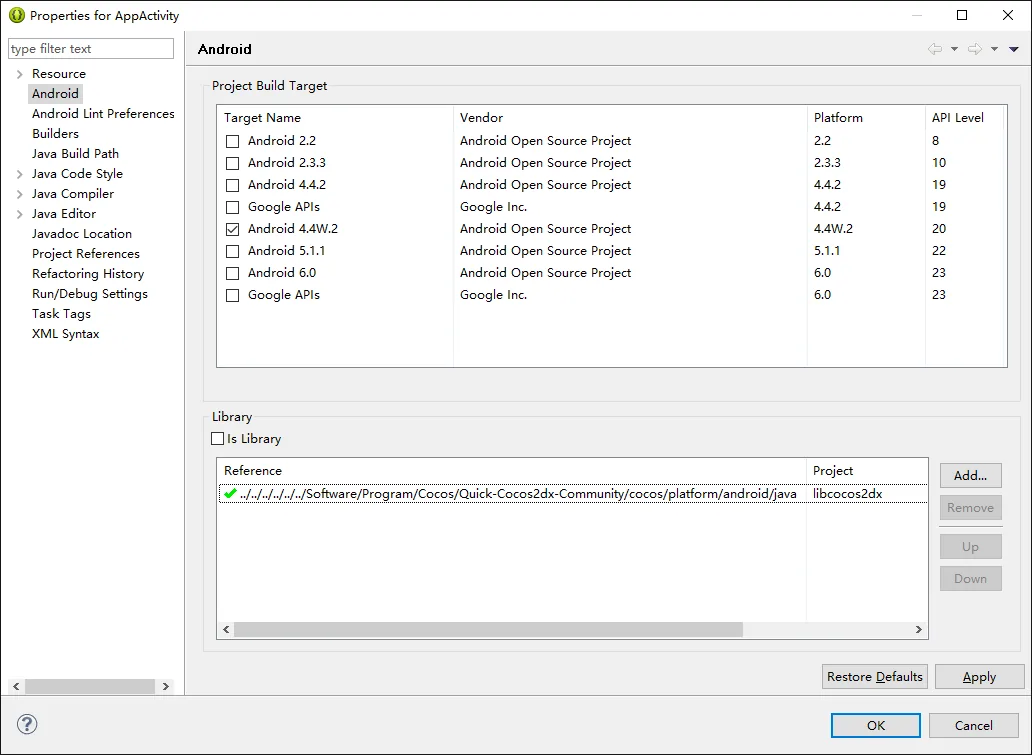
终于发现了解决这个BUG的办法:*** 将项目和想要引用的Library放在同一个分区内 *** 遂将项目和 Quick 放到同一个分区内后问题解决,效果如下:

引起这个错误的原因是:*** Eclipse 本身并不是给Windows 这种多分区系统定制的,本身是用来给 MAC 或者 Linux 这种以目录为结构的系统使用的 ***

不能再构造函数内使用 shared_from_this() 函数

class class_a : public std::enable_shared_from_this<class_a>
{
public:
    class_a(void)
    {
        auto self(shared_from_this());// 这里会报 bad_weak_ptr 错误
    }
};

子类无法重复继承

class class_a : public std::enable_shared_from_this<class_a>
{
};

class class_b : public class_a, public std::enable_shared_from_this<class_a>
{
};

这段代码将无法通过编译。 如果想返回子类的 shared_from_this 指针,则可以进行如下操作

class class_a : public std::enable_shared_from_this<class_a>
{
public:
    virtual ~class_a()// 为了确保 dynamic_pointer_cast 可以工作,需要父类拥有虚函数。
    {}
};

class class_b : public class_a
{
public:
    std::shared_ptr<class_b> shared_from_this(void)
    {
        return std::dynamic_pointer_cast<class_b>(class_a::shared_from_this());
    }
};

通常来说如果定义一个类时,如果这个类可能被继承使用时,将这个类的析构函数定义为虚函数来确保析构的调用顺序

打开 Visual Studio 2013 Command Prompt

wget http://www.nasm.us/pub/nasm/releasebuilds/2.11.08/win32/nasm-2.11.08-win32.zip
unzip nasm-2.11.08-win32.zip -d C:/nasm
set PATH=%PATH%;C:/nasm/
wget https://www.openssl.org/source/openssl-1.0.2d.tar.gz
tar xzf openssl-1.0.2d.tar.gz
cd openssl-1.0.2d
perl configure VC-WIN32 --prefix=C:/openssl
ms\do_nasm
nmake -f ms\nt.mak
nmake -f ms\nt.mak install
echo "build successed."

这样编译不会产生 error A2070:invalid instruction operands 这个错误

有时,把旧项目转换成新版本项目时,旧版本项目里使用的 maxmin 宏无法在新版本中正常编译.

原因是: 新版本内有了新的函数 std::maxstd::min 函数来实现这一功能

这时可以尝试使用如下方案解决:

  1. 包含algorithm文件
#include <algorithm>
  1. 明确使用 std::max(a,b) 而非 max(a,b)
  2. 定义宏 NOMINMAX
#define NOMINMAX